Skip to content Skip to side menu

News

Spring Is Here!

Spring Is Here!

Materials:


- Neenah 110lb Classic Crest Cardstock 8.5" x 11"
- Spring is Here 6x6 Paper Pad
- Spring is Here 6x8 Add-on Paper Pad
- Spring is Here Paper Die Cuts
- Mintay Chippies - Gardening
- Mintay Basic Patterned Paper, Sentiments-All Occasion
- 450 Quick Dry Adhesive 4.23 fl.oz
- 3D Pop Dots: 3/8" Round x162 Dual-Adhesive Foam Mount


 Preparation


1- Trim Neenah 110lb Classic Crest Cardstock to 4 ¼" x 8 ½" inches and score at 5 ½" to create the card base.
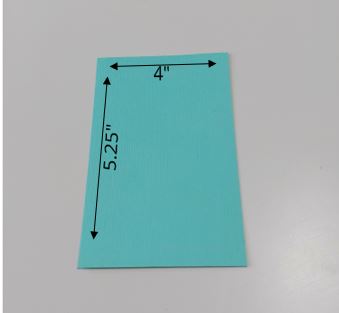
2- Trim a 5 1/4 x 4 panel from the Spring is Here Add-On Paper Pad
3- Trim a 4 3/4 x 3 1/2 panel from the Spring is Here Paper Pad, passing the scissors on the edge to make it look worn.
4- Paint the Fence from the Gardening Chippies with white paint.
5- Gather from the Paper Die Cuts – 2 butterflies, bunny and eggs
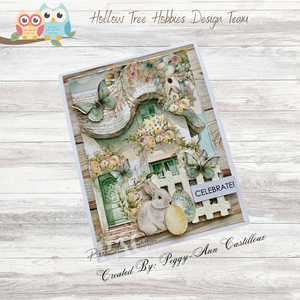
 

 Assembly


1- Glue your 5 ¼ x 4 panel to the card base using liquid glue


2- Mount the 4 ¾ x 3 ½ panel to your card front using 3d Pop Dots


3- Mount the painted white fence to the bottom right corner using liquid glue


4- Mount the butterflies, one in the left upper corner and the second on the fence using liquid glue.


5- Mount the bunny with liquid glue in front of the fence and the bigger size Easter egg with liquid glue and then the smaller Easter egg using 3d pop dots.


6- Finally cut the word Celebrate from the basic patterned paper, sentiments-All Occasion and adhere with liquid glue.


Designed By: Peggy-Ann Castilloux - Paper Crafter for Hollow Tree Hobbies Design Team 2024

Read more →

Let the Fun Begin Dino

Let the Fun Begin Dino

Material List:

Lost Shadow Distress Oxide Ink
Neenah 110 lbs. White Cardstock
Spellbinders – Birthday Dinosaur
Spellbinders – Essential gems – Spectrum
Spellbinders – Make a Wish Arch Labels.
Spellbinders – Monster Wishes Stamp


Instructions:

Step #1

Die cut the Spellbinders Birthday Dinosaur from a 110 lbs. white cardstock.
With scrap cardstock:

Die cut the spine from a pastel orange cardstock
Die cut the little flower using  pink, purple and teal cardstock.
Die cut Branch using pastel green.


Step #2

Using your blending brush ink the dinosaur body pieces with Distress Oxide Lost Shadow applying pressure on the brush in areas you would like darker.


Step #3

For the middle of the eyes and the lashes I die cut them on a 110 lbs. with white cardstock and colored with a black marker or you can cut out of black scrap cardstock


Step #4

Assemble the dinosaur by gluing eye, lashes, legs, and spine. Finish with gluing the flowers and branch on the top of the dinosaur head. See picture below for placement!


Step #5

Cut ½’’ x 4" strips from the following colors of cardstock yellow, green, teal, blue, orange pink, lavender, and purple cardstocks.


Step #6

Die cut the third arch die in Make a Wish Arch Label set from a 110 lbs. white cardstock.


Step #7

Cut a piece of white cardstock to 4" x 5 1/2".  Glue the eight strips of card stock from step #5 on to this piece of cardstock starting a ½" from the bottom.  When your finished you should have a 1/2" left at the top.


Step #8

Stamp sentiment in the left ‘’corner’’ of the arch using a black ink.


Step #9

Place foam dots/squares on the back of the Arch and center this arch on the rainbow stipes you created in Step #7.


Step #10

Glue the assembled dinosaur towards the base of the arch. Added some sparkle to the center of the flowers using Spellbinders Essential gems.


Step #11

Cut a piece of white cardstock at 5 3/8" x 4 1/8".  Center and glue dinosaur finished piece to this piece of cardstock


Step #12

Glue your matted piece in Step 11 to an A2 card base.  A2 card is 4 1/4" x 5 1/2"

Created by Natasha Boucher

2024 Hollow Tree Hobbies Design Team Member

Read more →

A Special Day

A Special Day

Supplies:

- Neenah 110lb Classic Crest Cardstock 8.5 x 11
- Color Swatch: Teal - 49 And Market Collection Pack 6" x 8"
- Color Swatch: Teal Rub-On Transfer Set
- Elements - Color Swatch: Teal Mini Laser Cut Outs
- White Twine
- 450 Quick Dry Adhesive 4.23 fl.oz
- 3D Pop Dots: 3/8"; Round Foam Mount


Preparation:


1- Trim Neenah 110lb Classic Crest Cardstock to 4 ¼ inches x 8 ½ inches and score at 5½ inches to create the card base.


2- Trim paper from the Collection pack to 4 x 5 ¼ inches, then cut it to make two
panels, 4 x 3 inches and 4 x 1 ¼ inches


3- From the mini laser cut elements cut the lace trim to 4 inches two times,
adhere to the two panels , one at the bottom and the second on the top using
liquid glue


4- Add twine on the larger panel just under the lace trim and glue the heart cut out
in the middle of the bow.


Assembly


1- Adhere the two panels from the collection pack to the card base using 3d pop dots leaving enough space to add the rub-on sentiment.


2- Add the rub on sentiment Special Day directly on the card base.


Read more →

Classy Floral Card

Classy Floral Card


Supplies:

- Neenah 110lb Classic Crest Cardstock 8.5 x 11
- Neenah 80lb Solar White Cardstock 8.5 x 11
- Simply Black - 8.5X11 Whole Spectrum Heavyweight Cardstock (25 Sheets)
- Color Swatch: Teal Rub-On Transfer Set
- Color Swatch: Teal - 49 And Market Collection Pack 
- Elements - Color Swatch: Teal Mini Laser Cut Outs
- Black Alcohol Marker
- 450 Quick Dry Adhesive 4.23 fl.oz
-3D Pop Dots: 3/8 Round x162 Dual-Adhesive Foam Mount

Preparation
1. Trim Neenah 110lb Classic Crest Cardstock to 5 1/2 inches x 8 ½ inches and score at 4 1/4inches to create the card base.


2. Trim Neenah 80lb Solar White Cardstock to 5 ¼ x 4 inches to create card base panel, using your black marker splatter the panel, I tapped my marker on my bonefolder to create the splatter.


3. Cut three rectangles to 1 1/2 x 3 inches out of the black cardstock, One rectangle 1 ¼ x 2 ¾ inches out of Neenah 80lb cardstock and two rectangles 1 ¼ x 2 ¾ inches out of the Color Swatch Teal Collection pack


4. Gather die-cuts from the Teal Mini Laser Cut Elements, I used 2 leaves,1 flower and the Best Friends tag.


Assembly
1. Mount the splattered panel to your card base using the liquid glue


2. Add the rub on to the white rectangle that is cut to 1 ¼ x 2 ¾ inches


3. Mount the 3 rectangles that are cut to 1 ¼ x 2 ¾ inches to the 3 black rectangles using the 3d pop dots, then adhere all 3 panels to your splattered panel using liquid glue. I used a ruler to space them evenly.


4. Glue the 2 leaves using liquid glue and adhere the flower using 3d pop dots to white rectangle over top of the rub on.


5. Mount the Best Friends tag to the white panel, ¼ of an inch from the bottom using 3d pop dots.

Created By:  Peggy-Ann Castilloux - Papercrafter for Hollow Tree Hobbies Design Team 2024

Read more →

Easy Step Card

Easy Step Card

Easy Step Card

Welcome to Hollow Tree Hobbies Blog and today I am going to share with you the measurements so you can pre-cut then follow along in the YouTube Video

Cutting Guide


#1.   4” x 3”

#2.   4 1/8” x 3 1/8” (make 2)

#3.   1 1/8” x 4 1/8”

#4.   4” x 3”

#5.   4” x 3”

#6.   1” x 4”


Read more →

Cupcake With Sprinkles Card For Beginners

Cupcake With Sprinkles Card For Beginners

Level: Beginner (for beginner cardmaker who are just starting and do not have a lot of tools nor a die cutting machine)

Tools Used:

Paper Cutter
Scoreboard
Ruler
Acrylic Block or Stamp Press
Black Ink (I prefer Archival ink as it dries fast)


Materials Used:

1 sheet - 8.5”x 11” Bazzill Classic White Cardstock

1 sheet - 12”x 12” Bazzill Aruba

1 sheet - 12"x 12" Bazzill Classic White Cardstock

1 sheet- 12”x 12” Pattern Paper – Dab of butter by Doodle Bug

1 sheet – 12”x 12” Pattern Paper – Cupcake Cuties by Doodle Bug

1 package – Made with Love Stickers by Doodle Bug

1 sentiment – Happy Birthday

Let us Get Started!

Step #1

Cut your 11”x8.5” Bazzill classic white cardstock to 11” this will remove the company product information

Step #2


Cut to 5.5” which is exactly in half.  This will give you 2 card bases for A2 cards.

 Step #3

Score the long side of the 11” x 5.5” card base at 4.25”.

Then fold base in half this created your A2 card blank.

It should look like this!

Step #4

With your 12”x12” sheet of Aruba cut a 4” strip.

Take the 4” strip and cut to 5.25” in length.

Keep left over piece to use for other matting pieces for this card.

Step #5

Center & Glue your 4”x 5.25” piece to the front of your A2 card base.

This will give you a 1/8” border around your card.

Step #6

Cut these pieces as per picture and the quantities.  These with matte your pattern paper and white pieces in the upcoming instructions.

Step #7

Cut the pattern pieces to the dimensions shown in picture.

Step #8

With Classic white cut the pieces and quantities according to the picture.

Step #9

Grab your white 2.25” x 0.75” piece.

Using your acrylic block or stamp platform, center & stamp with your favorite color of ink.

I like to use an archival ink with my sentiments as they dry fast, clear, and in this case used Memento Tuxedo Black.

Step #10

You are now going to glue your pattern, white squares and sentiment to the matting coordinating pieces. Use picture for reference.

 Step #11

Grab your card base already prepared in step #5

Center & Glue your pattern piece with measurements of 3.75” x 5” to your card leaving a 1/8” border.

Step #12

Step #13

Stick your sentiment on your card centering to your liking.

Place stickers of your choice on the white squares, and I added 2 little hearts on the sentiment.

Step #14

The paper used on this card was inspired by a great friend who brought me cupcakes for my birthday recently!  I enjoyed creating this card for the beginners without a lot of tools or supplies but it's also great for the experienced for the layout when you need to make a card fast!

Read more →