
Material List:
Lost Shadow Distress Oxide Ink
Neenah 110 lbs. White Cardstock
Spellbinders – Birthday Dinosaur
Spellbinders – Essential gems – Spectrum
Spellbinders – Make a Wish Arch Labels.
Spellbinders – Monster Wishes Stamp
Instructions:
Step #1
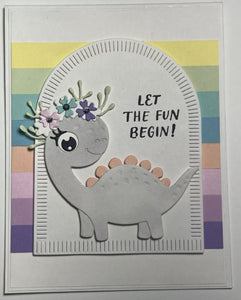
Die cut the Spellbinders Birthday Dinosaur from a 110 lbs. white cardstock.
With scrap cardstock:
Die cut the spine from a pastel orange cardstock
Die cut the little flower using pink, purple and teal cardstock.
Die cut Branch using pastel green.

Step #2
Using your blending brush ink the dinosaur body pieces with Distress Oxide Lost Shadow applying pressure on the brush in areas you would like darker.

Step #3
For the middle of the eyes and the lashes I die cut them on a 110 lbs. with white cardstock and colored with a black marker or you can cut out of black scrap cardstock
Step #4
Assemble the dinosaur by gluing eye, lashes, legs, and spine. Finish with gluing the flowers and branch on the top of the dinosaur head. See picture below for placement!

Step #5
Cut ½’’ x 4" strips from the following colors of cardstock yellow, green, teal, blue, orange pink, lavender, and purple cardstocks.

Step #6
Die cut the third arch die in Make a Wish Arch Label set from a 110 lbs. white cardstock.

Step #7
Cut a piece of white cardstock to 4" x 5 1/2". Glue the eight strips of card stock from step #5 on to this piece of cardstock starting a ½" from the bottom. When your finished you should have a 1/2" left at the top.

Step #8
Stamp sentiment in the left ‘’corner’’ of the arch using a black ink.
Step #9
Place foam dots/squares on the back of the Arch and center this arch on the rainbow stipes you created in Step #7.

Step #10
Glue the assembled dinosaur towards the base of the arch. Added some sparkle to the center of the flowers using Spellbinders Essential gems.

Step #11
Cut a piece of white cardstock at 5 3/8" x 4 1/8". Center and glue dinosaur finished piece to this piece of cardstock
Step #12
Glue your matted piece in Step 11 to an A2 card base. A2 card is 4 1/4" x 5 1/2"

Created by Natasha Boucher
2024 Hollow Tree Hobbies Design Team Member
Comments